|
|
| Home-->F1 Rocket Project-->Canopy Page 2 |
|
SITE CONTENTS
Please send your comments and suggestions to: Copyright
© 2008 by |
Links
on this page: Canopy Frame Fit Frame to Fuselage Canopy Removal Trick Fitting the Plexiglas |
|
|
Canopy Frame
The rear bow is a little tricky to mount because there's few, if any, reference points. I started by bending the bow so that the center of the tubes aligned with the outside edge of the canopy tracks. I then set the center canopy track so that I had the 1/8" measurement called for in the plans.
What seemed to work for me was to place the canopy track about 1 1/2" above the rear bulkhead deck, With the rear bow temporarily taped in place, I checked to ensure adequate clearance for the hold down pins. If they are not low enough to adequately engage the hold down bracket, you can shift the center canopy track forward and re-adjust. When the rear bow stands more upright, the pins are lower. At this point I tack welded the rear bow to the side rails.
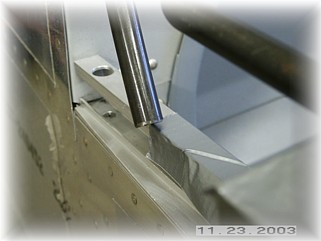
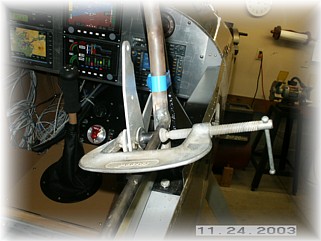
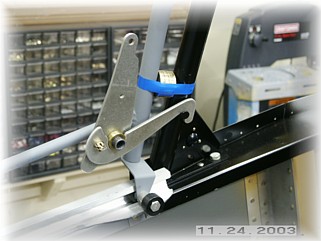
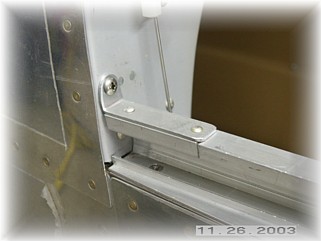
Now comes the moment of truth. I slid the canopy frame towards the rear to check the rear clearance of the tube on the side of the fuselage. The clearance is close but more than enough. You can make minor adjustments by sliding the rear canopy track side to side to get even clearance on both sides. I fit the front pivot points for the canopy locks and tack welded them in place.
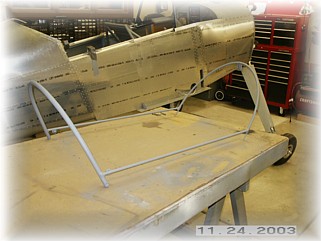
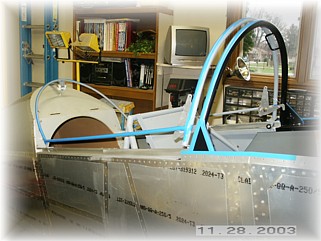
Now that I'm sure everything fit, I took the frame over to my bench and welded everything together. After thoroughly cleaning the frame, I went ahead and primed it. This is the most difficult, and the most critical part of the assembly. Even though the frame has been custom welded to fit the airframe, it still needs tweaking in order for it to fit and function perfectly. After some trail and error, I came up with the following procedure for getting the frame whipped into shape. First, the assumptions. At this point, the frame should be fully assembled with the front and rear bows bent to the proper shape. The front canopy locks should be assembled in their final configuration and on the frame. The canopy wheel trucks should also be assembled and on the frame.
1) Put the frame in the tracks and lock down the front canopy locks. Insert spacers between the canopy bow and the windshield bow to keep tension on the locks. Tape these in place so they don't move or fall out. 2) Set the rear of the frame on the spacer blocks just forward of the hold down pins. Tape these blocks in place so they don't move or fall out. Use the 1 1/4 spacers that sit on top of the canopy rails. 3) Remove the rear slider rail and the rear hold down fixtures. You will IGNORE their placement until the very end of the procedure. 4) With the frame locked in the front and sitting on the block, gently twist and bend the frame so that it sits "lightly" on the blocks and the hold down pins are next to the outside edge of the canopy tracks. Be sure to watch for any lateral mismatch between the front and rear bows. My frame was skewed a little bit. The other thing to watch for is to make sure that the left and right side rails are just barely resting on the blocks. You don't want either side to have more pressure on the blocks than the other side. The goal here is to get the frame to sit in the proper location in its natural state, without being held there.
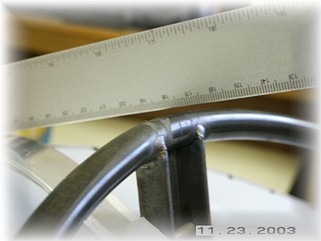
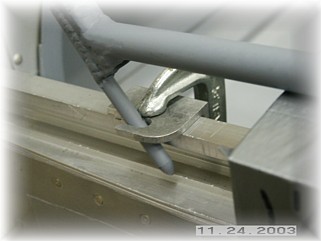
5) Now, slide the rear canopy track into place without moving the frame. Check the vertical distance between the top of the rear bow and a straightedge held along the top surface of the track. You should have 1/8" clearance here. If not, remove the track and bend the rear bow to get the right height. This may also require you to remove the frame from the fuselage. If it does, bend the rear bow on your bench, and go back to the first step. If not, then continue. 6) Tape the rear canopy track in place. This now establishes the center of the rear canopy bow. Release the front canopy locks and slide the canopy frame slightly back to check the clearance along the sides of the fuselage. If one or both side touch the sides, determine whether one side of the rear bow needs to be bent or both sides. I think the mistake that some folks might make is that they just grab the rear bow and pull it apart. That will change the center point of the rear bow and throw the alignment pins out of whack. If the rear bow does not hit the side of the fuselage, skip down to step 8. 7) Once you've determined which side to bend, carefully remove the frame from the fuselage and take it over to your workbench. Measure the distance between the hold down pins. Remember, these should still be in the proper alignment with the fuselage. Now, use your tubing bender to make VERY SMALL bends the appropriate side of the rear bow outward. Check you measurement of the alignment pins and hammer the pins either in or out to get the same measurement as before. Put the frame back on the fuselage and go back to STEP 1!. Yes, I said step one. You'd be amazed at how small bends in one area changes the geometry of the frame in other areas. By going back to the first step, you will systematically reset the frame to fit properly. 8) You now have the rear canopy track sitting in the right fore and aft position to hold the canopy frame at the right height. It is also centered left and right so that the canopy frame doesn't hit the fuselage. Drill the rear track to the fuselage at this point per the instructions in the manual. Double check that the frame slides freely fore and aft and doesn't hit anything.
9) Slide the frame forward and lock the front canopy locks in place. Again, use the spacers between the two bows to hold the locks closed. Now, with the frame sitting on the rear spacer blocks, double check the rear canopy height. Fix any misalignments now. If everything looks good, slide the rear canopy hold down fixtures in place to properly engage the hold down pins. Make any adjustments to these fixtures now so that the pins will slide smoothly in and out. Clamp the pins in place. Release the front locks and slide the frame back and forth to ensure smooth operation and that the frame pins engage properly and slide fully into the slot when the front canopy locks are engaged. When everything looks good, drill the hold down fixtures to the canopy rail per the instructions. Note that once you remove the rear spacer blocks, it will seem like the front locks won't hold their position and will want to pop open. The tendency is to mess with the pins. DON'T DO ANYTHING YET. Wait until the Plexiglas and rear skirts are put into place. Without the blocks, the frame tends to slide down the rear rail a little, loosening up the hold down pins. This will tighten up once the rear skirts are installed, so don't fret. Just move one.
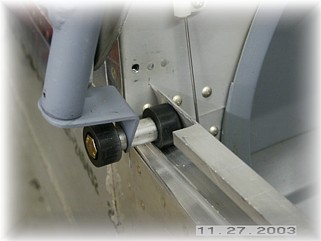
Once again from the Tom Martin file of tips, I borrowed this idea. When removing the canopy frame over and over, the plans call for you to remove the front trucks by removing the screw. Tom came up with this nifty idea to remove a small piece of the rear rail and rivet it to the clip. So that's what I did. As a result, I couldn't find any reason not to permanently attach the trucks to the canopy frame, do I did so with steel pop rivets. That will eliminate the unsightly screw in the front face of the front canopy bow.
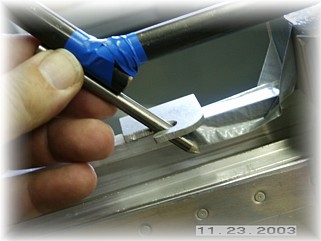
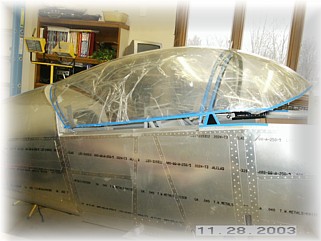
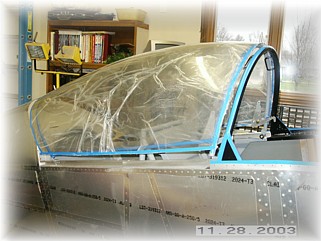
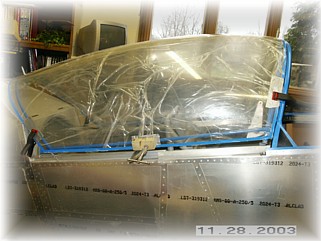
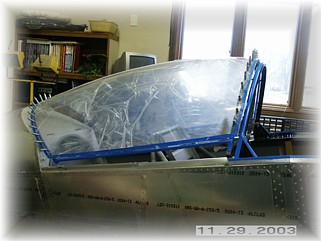
Before fitting the Plexiglas to the canopy frame, I covered everything with tape to protect the Plexiglas from scratches. I made some of the initial cuts that were laid out on the canopy by Mark. This got it kind of close. At this point, I had cut the sides and back at least twice.
I carefully laid out the cut line for the windshield and cut it off from the rest of the canopy. The fit at this point was not very good because the sides of the canopy have a lot of curve in them. Don't worry about it. The fit will be fixed later when the windshield piece is added later. Next, I clamped the canopy to the frame in preparation for the final cuts in the Plexiglas and for drilling the mounting holes.
After marking the final side and rear cuts, I trimmed the canopy for the final time and sanded the edges smooth. I then drilled all the mounting holes per the plans with the exception of the lower hole on each side on both the front and rear frame member. Since I'm not sure where the actual side skins will end up, I left these holes undrilled for now. I will drill these holes later. I unhooked the hold down locks and checked to see if the frame would still slide without binding. Fortunately, everything still worked just like it is supposed to work. Next, I will work on the side skins. That begins on the next page. |
||
|
"The
best thing about the future is that it comes one day at a time." |